This post may contain affiliate links.Please read our disclosure policy.
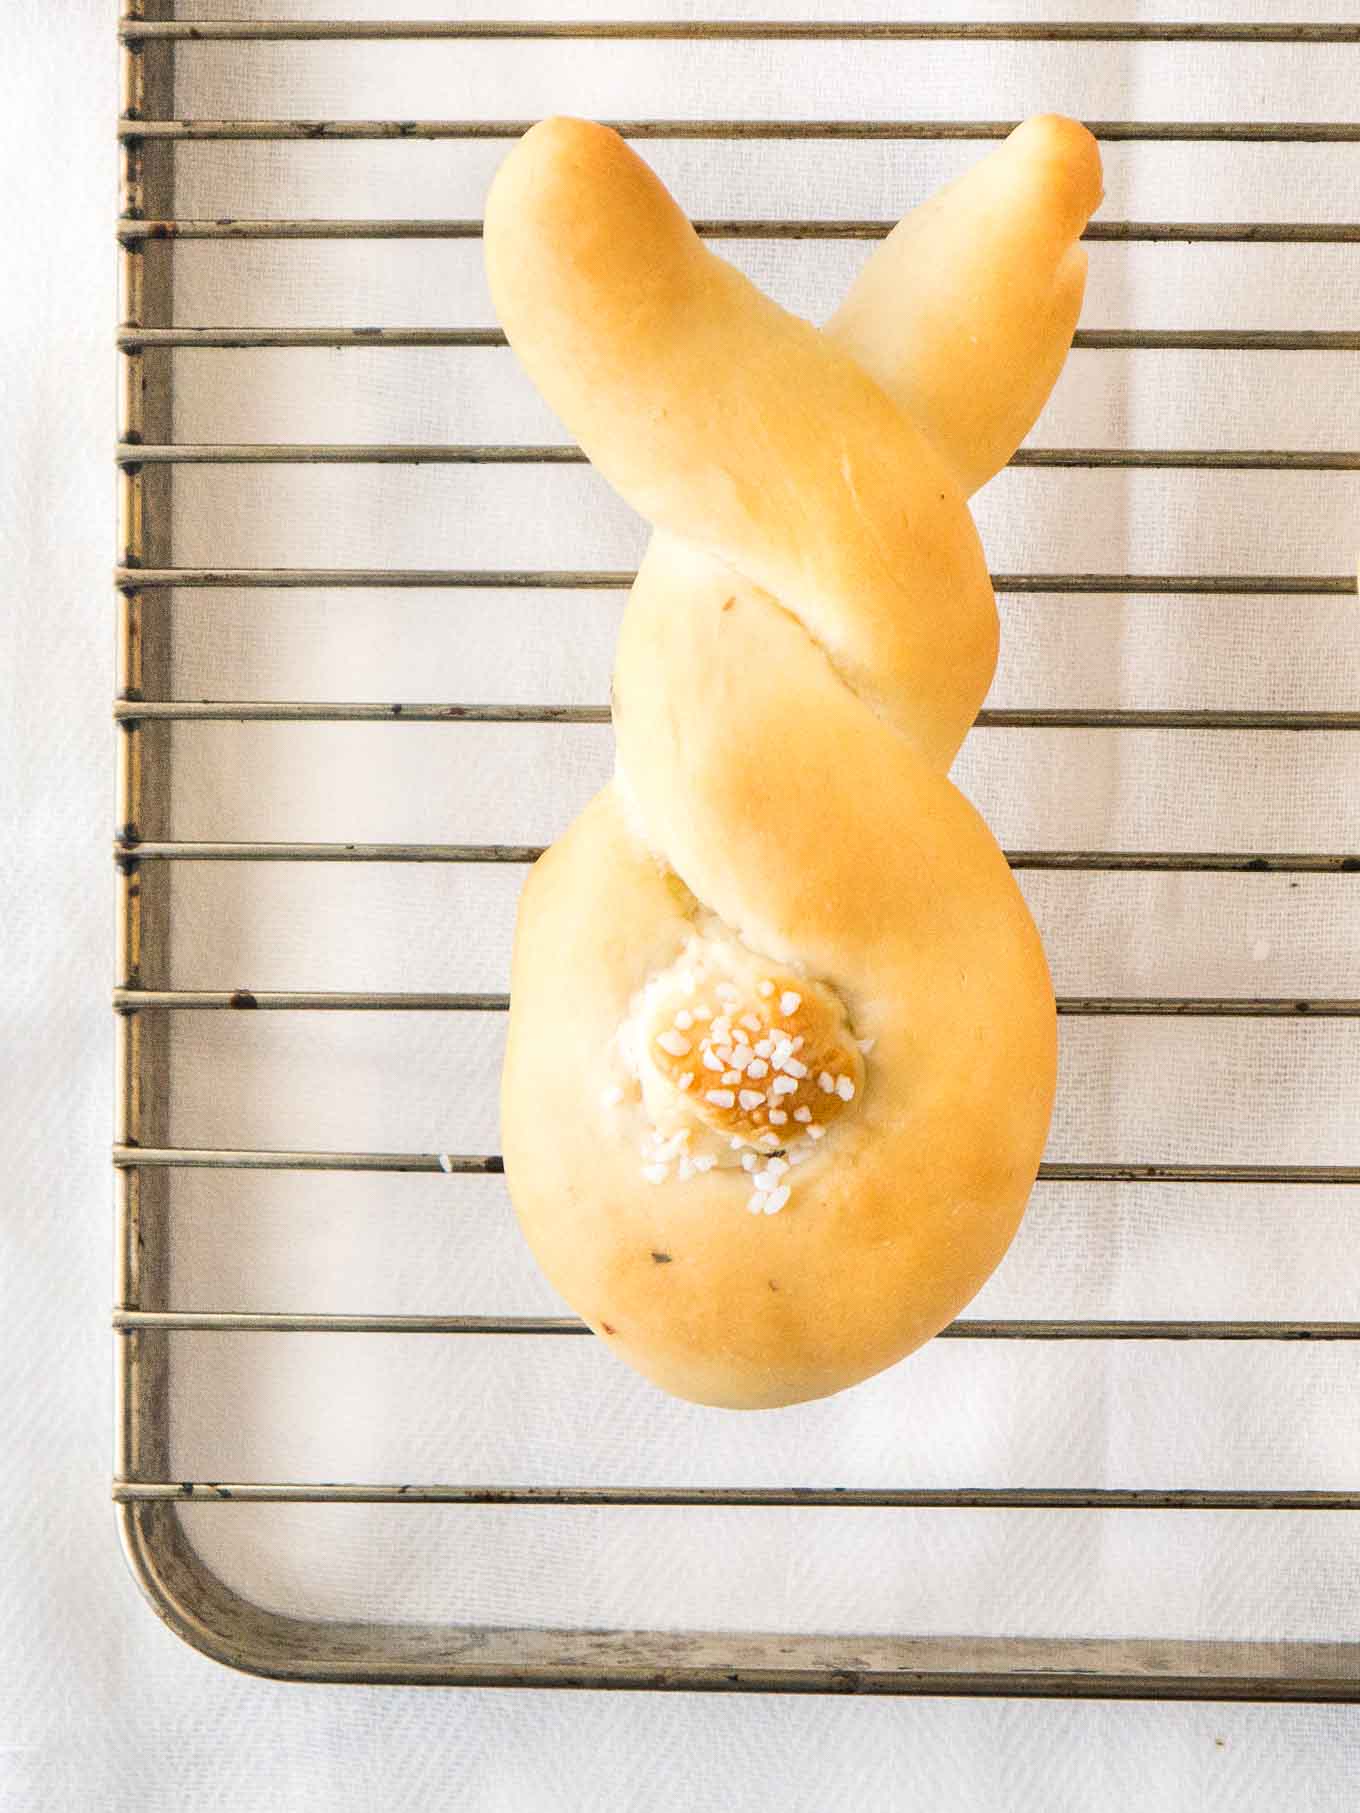
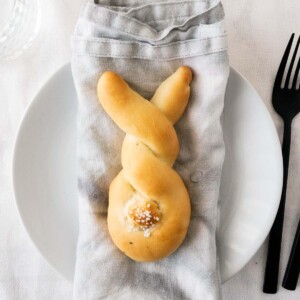
These Easter Bunny Rolls are so easy to make and perfect for brunch or dinner! Made from fool-proof homemade yeast dough, these cute bunny-shaped rolls are buttery, fluffy, and so cute with their salty tails.
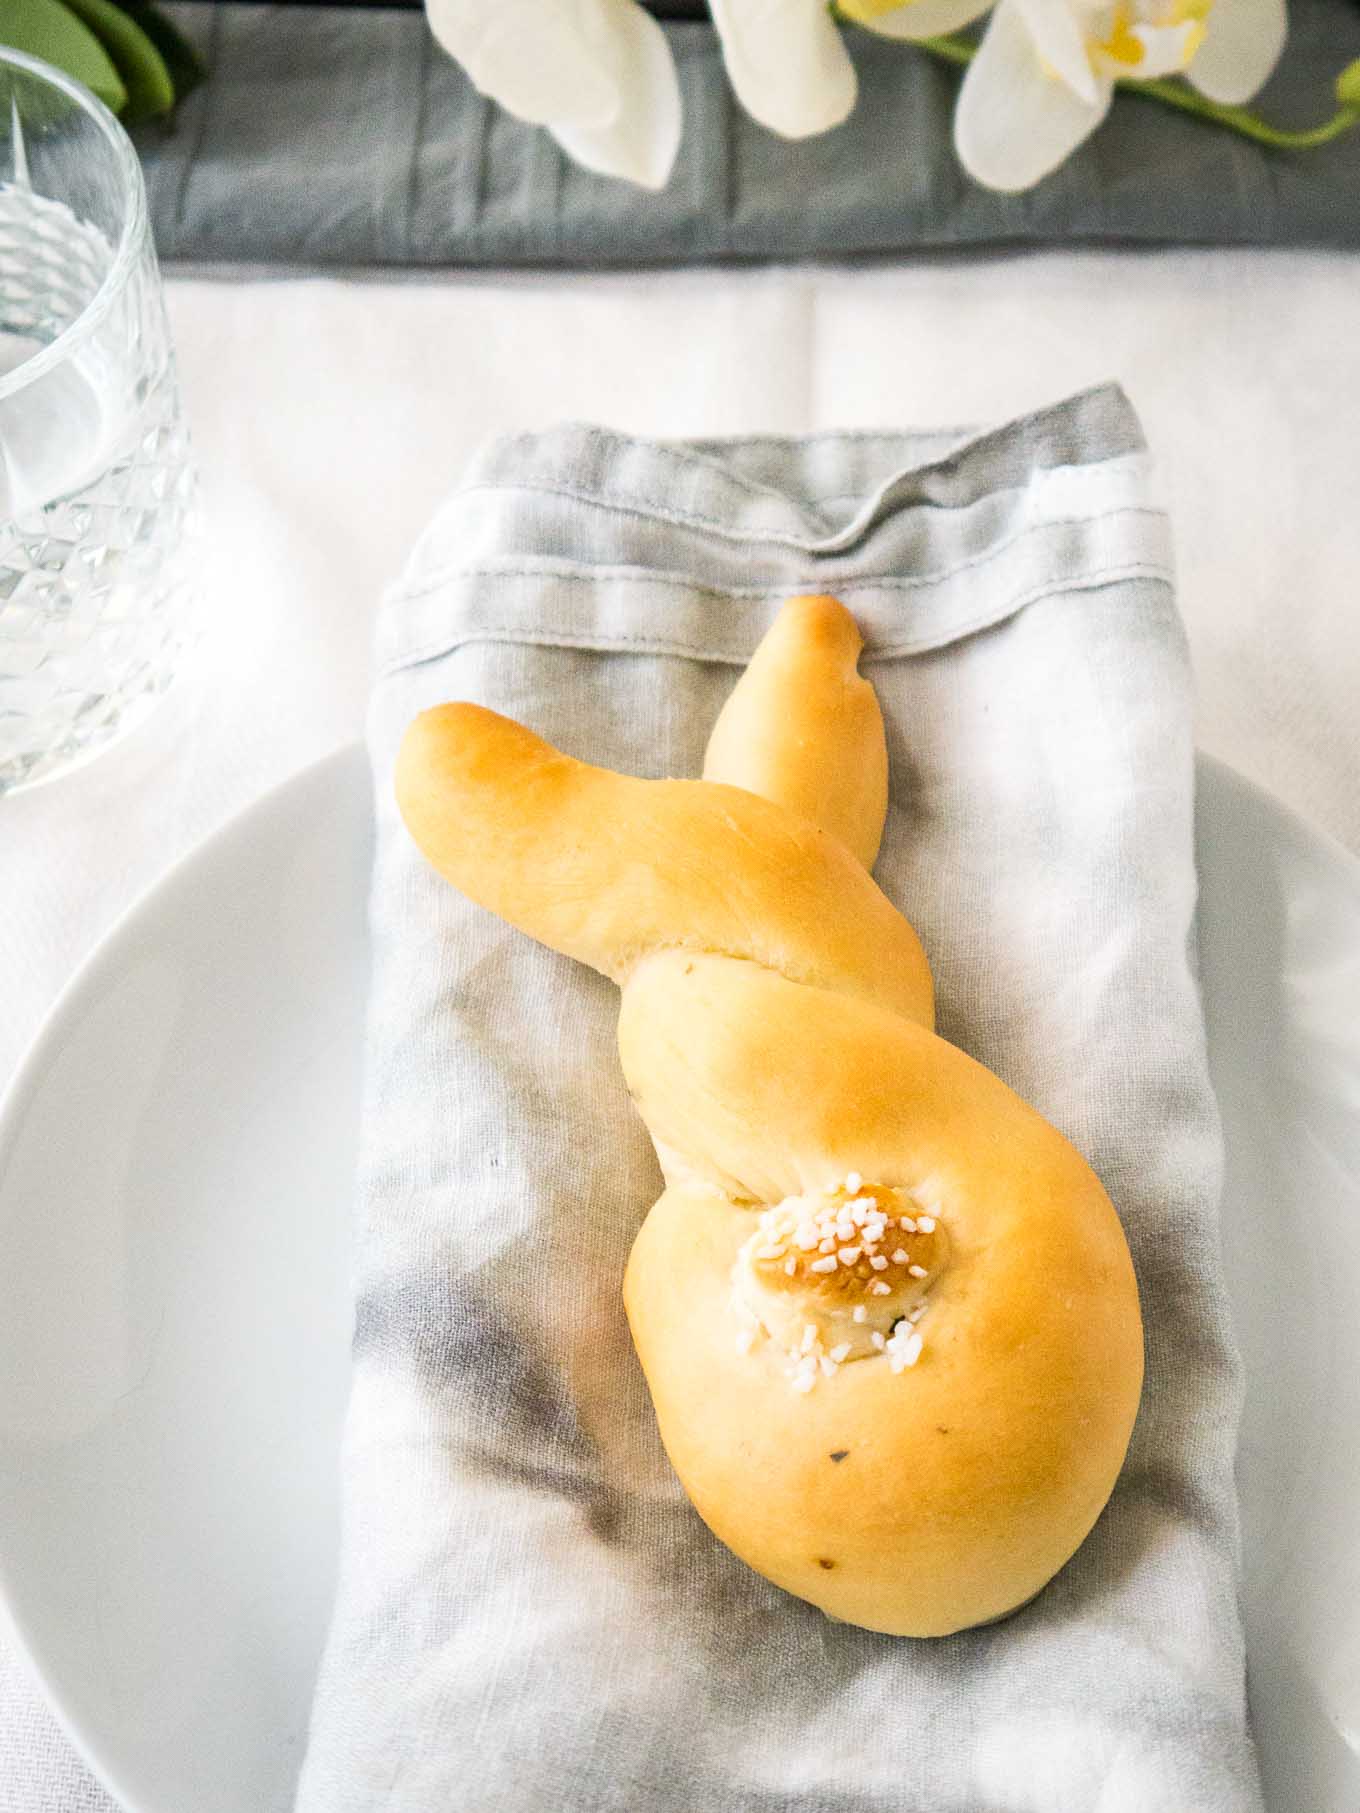
Soft and buttery Bunny rolls are an adorable and fun twist on traditional dinner rolls. They are perfect for adding a festive touch to your Easter or springtime meals, but can also be enjoyed year-round as a playful addition to any dinner table.
Made from scratch with simple beginner-friendly yeast dough just like our popular white bread recipe, these soft and fluffy rolls are shaped like cute bunnies with ears and tails. Once baked, serve them warm with butter or use them for making festive sandwiches.
Why you’ll love this recipe
- Bunny-shaped dinner rolls make a fun addition to your Easter dinner
- Super easy to make from scratch
- Soft and fluffy rolls that look and taste delicious
Ingredient notes
Here is an overview of the ingredients you’ll need for this recipe. Scroll down to the recipe card at the bottom for quantities.
- Flour – Use all-purpose flour. Make sure to measure the flour correctly, using a spoon to fill the measuring cup and level it off with a knife. You can also use bread flour if you have it on hand.
- Yeast – You need Instant dry yeast for this recipe. Instant yeast can be added directly to the flour mixture, while active dry yeast needs to be activated first.
- Water – The water should be lukewarm, but not hot. Using warm water helps the dough rise faster. The ideal temperature is between 105° and 115°F.
- Vegetable oil – A flavor-neutral oil like avocado oil works best for this recipe.
- Egg – The egg is only needed for the egg wash. I prefer using an egg because it gives a nice color and sheen and helps the coarse salt stick.
- Butter – Brushing the baked bunnies with butter adds flavor.
How to make this recipe
Detailed measurements and instructions can be found at the bottom of the page on the printable recipe card.
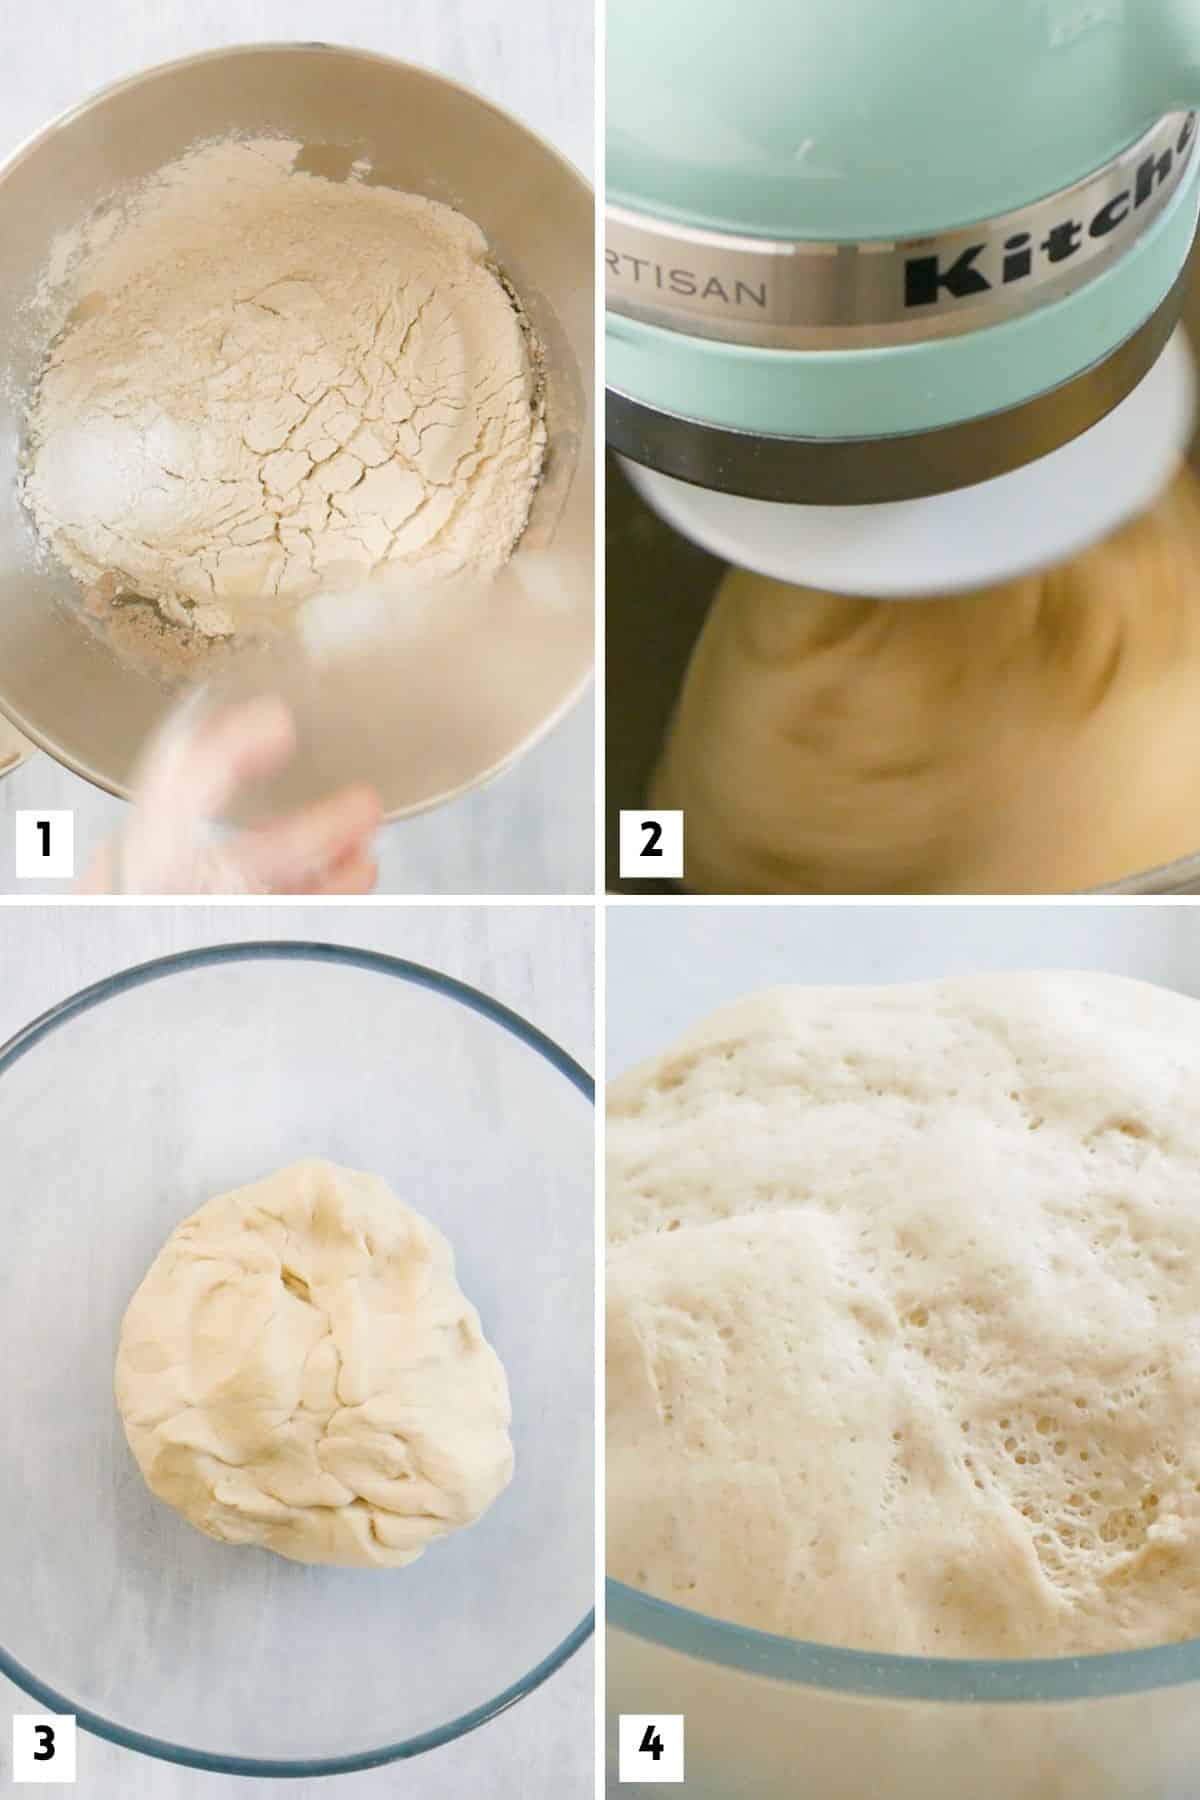
To make these rolls, you need a stand mixer to knead the dough (or use your hands for a little workout) and a little bit of patience. After combining all the ingredients (Image 1), knead the dough until it pulls away from the side of the bowl and is smooth and elastic (Image 2).
The yeast dough needs to rise for about 1 to 2 hours until it has doubled in size (Images 3 and 4). That’s really important, the yeast needs time to do its work, otherwise your rolls will taste like yeast.
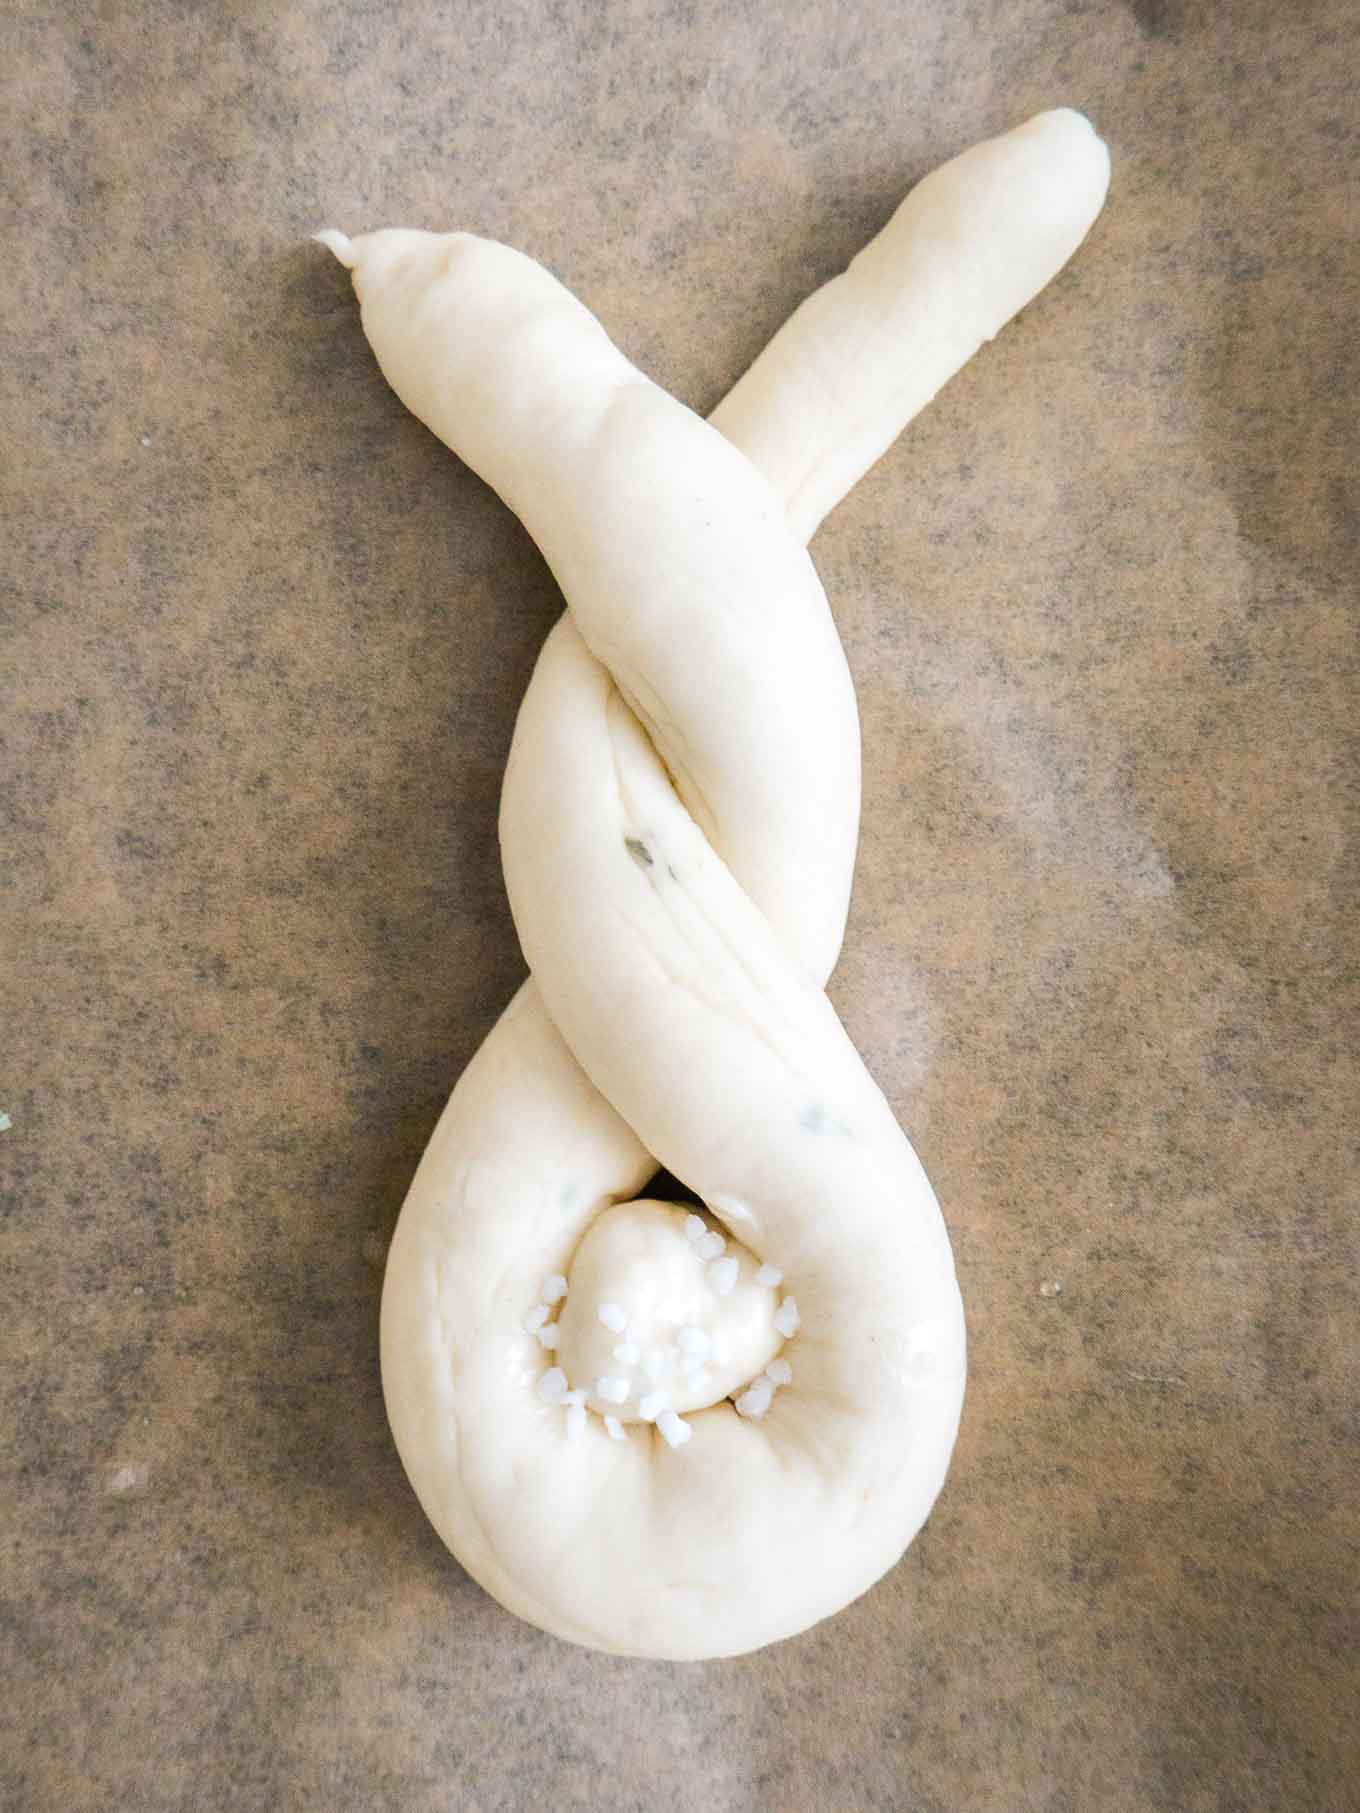
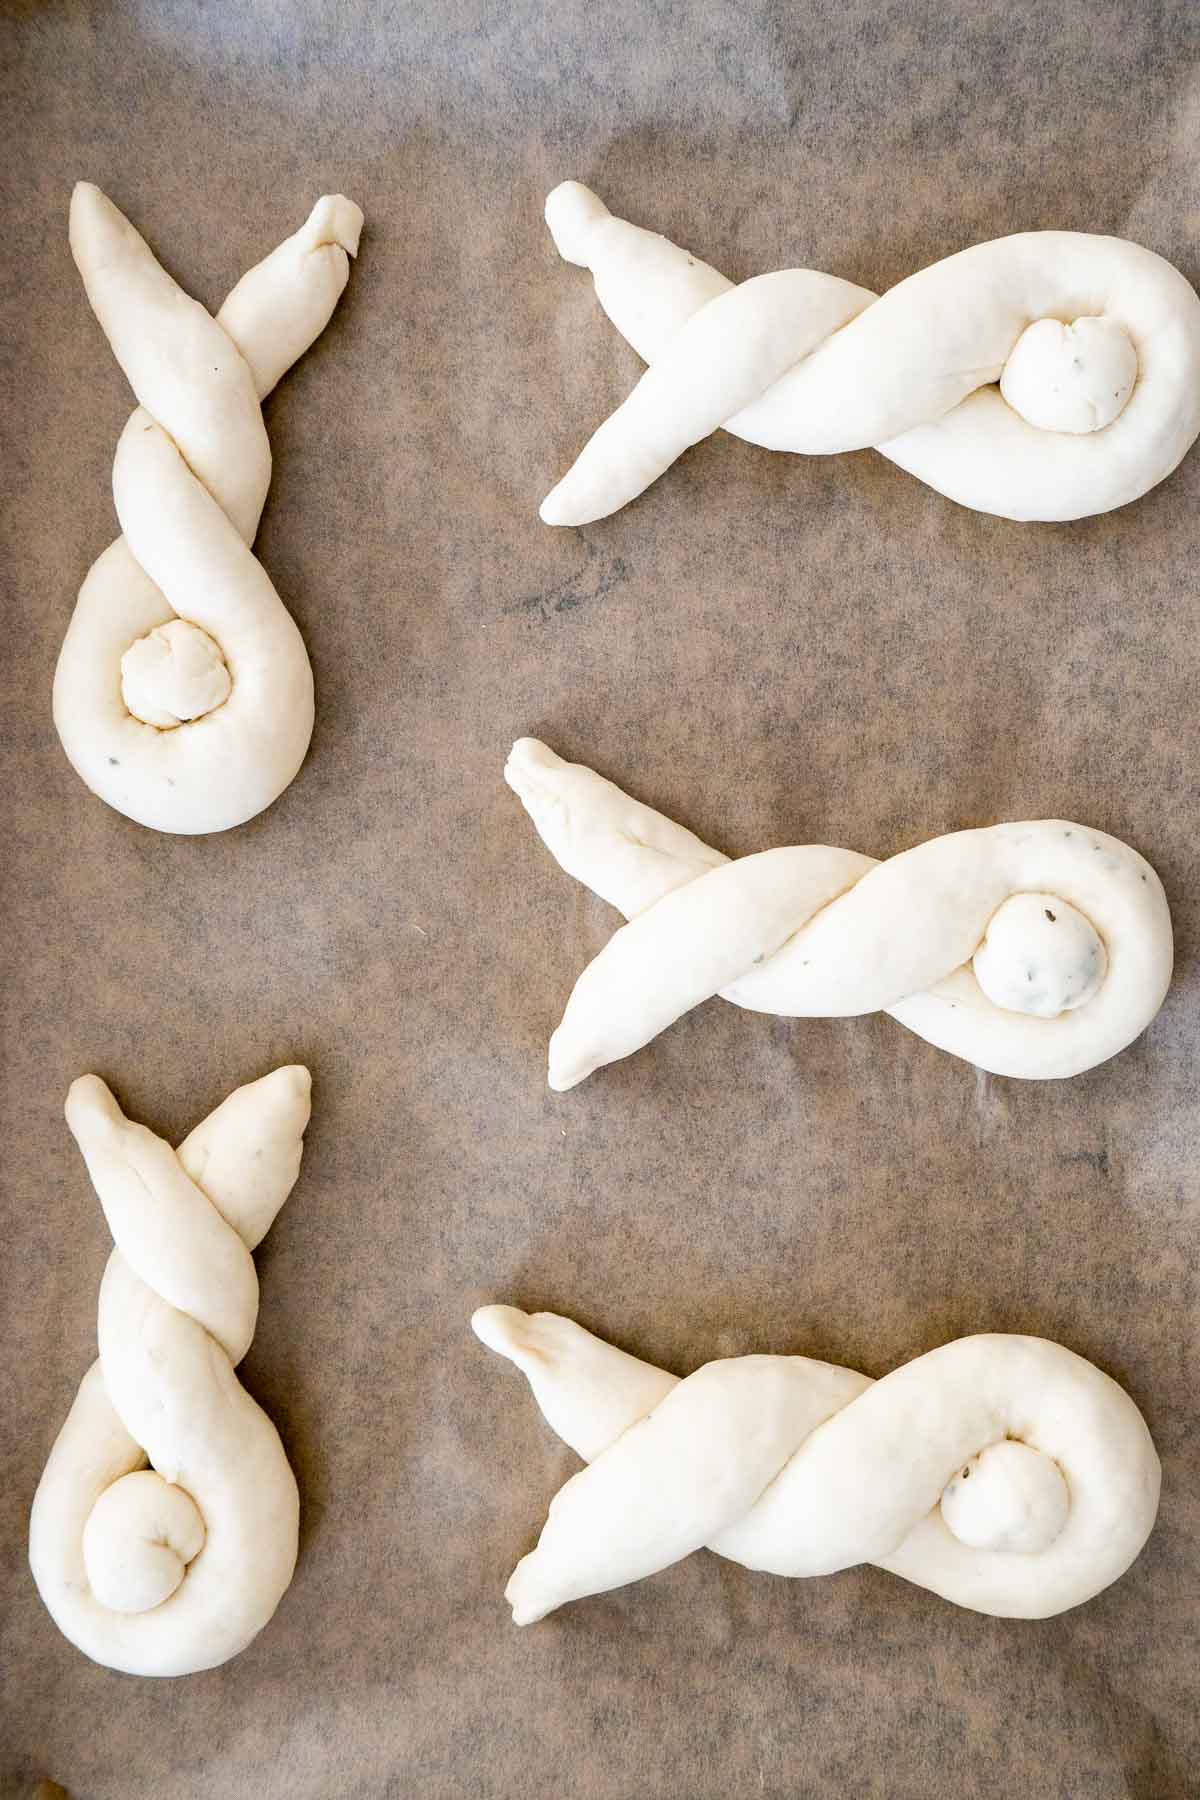
When you shape the bunny rolls, make sure to press down the overlapping ear to prevent it from rising too high during baking. To sprinkle the tails, you can also use coarse sugar instead of coarse sea salt if you are aiming for sweeter bread.
These Easter Bunny Dinner Breadsticks are fluffy, buttery and so simple to make. And if it’s not the right time of the year for Bunnies, then you could just make normal rolls from the dough!
Expert tips for success
- The right type of yeast: Make sure to use instant dry yeast and check the date before adding it to the mixture.
- Ingredients: When making yeast dough, make sure your ingredients are at room temperature. Warm ingredients will help activate the yeast and make the dough rise faster.
- Kneading: Kneading the dough helps develop the gluten in the dough, which creates a chewy texture. Use a stand mixer with the dough hook or knead by hand for about 10 minutes until the dough is smooth and elastic.
- Let the dough rise: After kneading, let the dough rise in a warm place until it doubles in size. This can take anywhere from 30 to 90 minutes, depending on the temperature in your house and how yeast-friendly it is.
- Don’t overwork the dough: Once the dough has risen, don’t overwork it. Gently punch it down with your hands and shape it before letting it rise again.
- Baking: Make sure not to overbake the bunnies. Bake them until the tops are golden brown and the edges look cooked. Baking time might vary depending on your oven.
Recipe FAQs
Bread rolls may turn out dense if the dough was not allowed to rise properly. Give the dough enough time to rise in a warm, draft-free place.
Yes, active dry yeast can be substituted for instant yeast. However, you’ll need a bit more active dry yeast to produce the same results. You also need to activate the yeast in the warm water before adding the remaining ingredients.
There are several reasons why your yeast dough may not be rising properly, such as using old or expired yeast, not using warm enough water to activate the yeast, using water that is too hot, or not giving the dough enough time to rise. Make sure to follow the recipe instructions carefully and give the dough enough time to rise in a warm, draft-free place.
More Easter recipes to try
Easter Bunny Rolls
Ingredients
- 3 cups all-purpose flour
- 2 ½ tsp Instant dry yeast
- 1 cup warm water
- 1 tbsp granulated sugar
- 1 tsp salt
- ¼ cup vegetable oil
- 1 egg
- 1 tbsp coarse sea salt
- 2 tbsp unsalted butter, melted
Instructions
- Pour lukewarm water into the bowl of a stand mixer fitted with the dough hook attachment. Add yeast, sugar, salt, oil, and flour.
- Knead on low-medium speed for about 4 minutes, until a smooth, elastic dough forms. The dough should be thick, yet soft and only slightly sticky. When it pulls away from the sides of the bowl, it's ready.
- Place the dough in a greased bowl and turn the dough over to coat all sides. Cover the bowl with plastic wrap and place it in a warm environment to rise until doubled in size, about 1 hour.
- Once doubled in size, punch the dough down to release any air bubbles. Remove the dough from the bowl and turn it out onto a lightly floured surface. Divide the dough into 6 equal pieces.
- Heat oven to 350°F (180°C). Line your cookie sheet with parchment paper, a silicone baking mat, or lightly grease the cookie sheet.
- Roll each ball of dough into a rope about 14 inches long. Cut a 1/2-inch piece off the end, and roll into a ball for the tail. Fold the dough rope in half, and loosely twist twice to form the body of the bunny. Place on a cookie sheet and press down the overlapping ear a little bit to prevent it from rising too high. To make the bunny tail, press a ball of dough into the folded end of the twist. Repeat with remaining dough to make 6 bunnies. Let the bunnies rise for 5–10 minutes.
- Brush the tails with egg wash and sprinkle with coarse sea salt.
- Bake the bunnies for 23–25 minutes until the tops are golden brown and the edges look cooked. Remove the rolls from the oven when they are done and brush butter onto each warm bunny.
Video
Notes
-
- The right type of yeast: Make sure to use instant dry yeast and check the date before adding it to the mixture.
-
- Ingredients: When making yeast dough, make sure your ingredients are at room temperature. Warm ingredients will help activate the yeast and make the dough rise faster.
-
- Kneading: Kneading the dough helps develop the gluten in the dough, which creates a chewy texture. Use a stand mixer with the dough hook or knead by hand for about 10 minutes until the dough is smooth and elastic.
-
- Let the dough rise: After kneading, let the dough rise in a warm place until it doubles in size. This can take anywhere from 30 to 90 minutes, depending on the temperature in your house and how yeast-friendly it is.
-
- Don’t overwork the dough: Once the dough has risen, don’t overwork it. Gently punch it down with your hands and shape it before letting it rise again.
-
- Baking: Make sure not to overbake the bunnies. Bake them until the tops are golden brown and the edges look cooked. Baking time might vary depending on your oven.


So after kneading with the stand mixer -step #2-do you then knead it again by hand? Because the last sentence in step 2 says “…it’s ready to knead”
Hi Jen, thanks for finding my little mistake! I edited the recipe. No need to knead it again by hand, just knead it in your stand mixer for about 3-4 minutes until the dough pulls away from the side of the bowl. Happy Easter!
Step 2 says “when it pulls away….it’s ready to knead”. But the next step is rising. How much more kneading is required after step 2? Thank you.
Hi Carleen, thanks for finding my mistake! I edited the recipe. No need to knead it again by hand, just knead it in your stand mixer for about 3-4 minutes until the dough pulls away from the side of the bowl. Happy Easter!
These look delicious… Sharing on Facebook and Pinning!
YUM!
These are too stinken cute! Pinned.
look at this bread!!! just too cute to eat!!!!
Thank you, Susan!
How far ahead of time can these be made?
Hi Michelle, as with all homemade bread, it is best served on the day it’s made. I store leftover bunnies in a ziploc bag and reheat them the next day on top of the toaster (15 seconds in the microwave work too). But the bunnies taste best on the day they’re made. I hope that helps! Let me know if you have any other questions! – Julia
These look super cute, is there any way to make these the day before and only half bake them, freeze them and bake the whole way the following day? I’d like to make them the day before but not sure if they will be as good baked the day before.
Hi Cristy, they definitely taste best on the day they’re baked. I haven’t tried freezing them but I probably would bake them the whole way, brush with butter, let them cool, and then freeze them. Defrost them on the day you want to serve them and reheat for a few minutes in a 325°F oven. You might need to cover them with foil to avoid the surface getting too crisp. Another way that would probably work is to shape the bunnies, cover with cling wrap, refrigerate them for 4-24 hours and then bake them. – Julia
I love the bunny rolls, so cute!
Thanks, Anne :-)
These bunny rolls are so cute! I can see them being a perfect addition to an Easter dinner!
Thank you, Andrea!
How cute, these look fun and tasty! I’ve never seen vegan butter before, I’m going to keep my eyes out for it.